Introduction: Why Bobbin Tension Matters
Every quilter understands the struggle: hours into an exciting project, feeling the rhythm of your stitches, when suddenly you examine the back of your quilt and the threads resemble a chaotic threadstorm! Loops, puckers, broken threads, and skipped stitches are classic signs that your sewing machine's tension may be unbalanced. While we recommend starting with adjusting the top tension (please read our educational article on balanced tension if you haven't yet), which often resolves these issues, there are times when the bobbin tension is the culprit and the reason for uneven thread tension.
This educational article focuses on bobbin tension for both home sewing machines and longarm machines. Understanding the role of bobbin tension in achieving balanced, high-quality stitches will serve you well. The content in this article is written based on the assumption that you have already adjusted your top tension as necessary and continue to experience tension issues that lead you to believe the bobbin tension needs to be adjusted. The good news is that changing your bobbin tension isn't as intimidating as you might think. With a few simple steps and a little practice, you can quickly rectify any tension issue and keep your machine running smoothly, with perfectly balanced stitches.
Tension 101 – Start With the Basics
The top tension of your machine is mainly influenced by the tension discs, which apply pressure to the top thread through a spring mechanism or electromagnets as the thread passes through. The tension control apparatus, a wheel, rotary dial, or digital touch screen, allows you to adjust the tension by setting a number between 0 and 9. A higher number indicates tighter tension, with a lower number indicating looser tension.

Tension settings are displayed on a computerized sewing machine.
A combination of factors affects top tension management on longarm machines. These include the primary tensioner, which consists of tension discs regulated by a spring and screw mechanism, and a tension guide or rod, typically a small metal bar with three holes through which the thread loops. Some machines also feature an intermittent tensioner or a thread sensor guide, as well as an additional thread guide or rod near the cone holder.
A good rule of thumb is that the more contact the top thread has with the machine, the greater the tension placed on the thread. To loosen the top tension on a longarm machine, adjust the spring tension on the primary tensioner and reduce the number of contact points the thread has with the machine. You can achieve this by threading the top thread through only one of the three holes in the tension guide, bypassing the intermittent tensioner, or skipping the first thread guide, among other methods.

The three-hole tension guide on a longarm machine with QuiltMaker thread.

A longarm machine's main tension assembly. The spring applies pressure to the discs, which controls tension on the thread.
Understanding Bobbin Tension
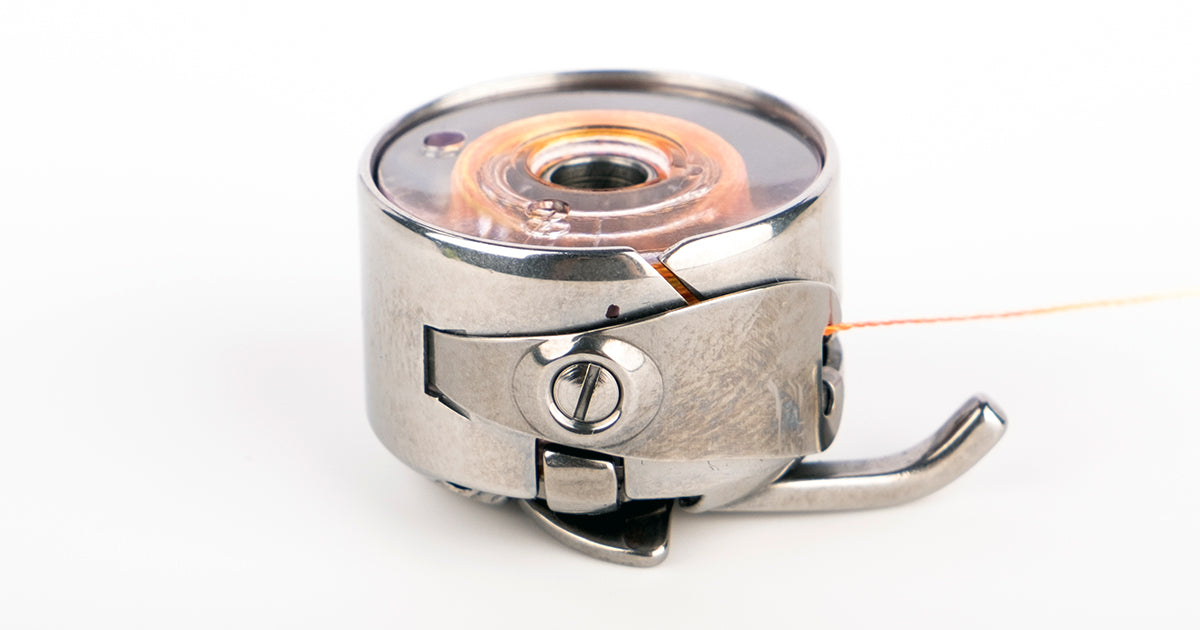
Tension control on a bobbin thread is very different than the top thread. There are no tension discs or electromagnets on the bobbin case. Instead, bobbin cases have a tiny metal spring that the bobbin thread passes through during the threading process. There is a small screw on the spring that, when tightened, shrinks the gap between the spring and the case, thus adding pressure to the thread. When the screw is loosened, it reduces the pressure on the spring, thereby decreasing the tension on the thread.
Think of the top thread and bobbin thread as dance partners in the "Waltz of the Stitches." They have to work together, each pulling with equal force, so the stitch locks neatly in the middle of your quilt sandwich. If one partner pulls harder than the other, the choreography will struggle, and the entire performance will stumble.
Examples of Unbalanced Bobbin Tension include:
- Hallmarks of too-tight bobbin tension include: The top thread is being pulled harshly to the underside of the quilt, resulting in the top thread forming loops (called looping), or a bird's nest (which is the tangling and buildup of thread), or repeatedly broken threads.
- Hallmarks of too-loose bobbin tension include: Bobbin thread peeking through the top fabric. If you see what looks like dots or even whole stitches of your bobbin thread on the top of your quilt sandwich, the bobbin tension is too loose (your top tension could be too tight), resulting in the top thread pulling the bobbin thread to the surface.
The Role of the Bobbin Case
The bobbin case is the part of your sewing machine that holds the bobbin securely in place under the needle plate. As you stitch, the case keeps the bobbin steady while allowing the thread to feed out smoothly so the machine can form stitches. Each time the needle comes down, the machine's hook catches the bobbin thread and joins it with the top thread to create a strong, balanced stitch.
Beyond simply holding the bobbin, the case also controls the tension of the bobbin thread. A small spring inside the case adds just the right amount of resistance, allowing the thread to flow evenly. This balance is what keeps your stitches looking neat on both sides of your quilt sandwich. When the bobbin case is working correctly, your seams lie flat, your stitches are even, and you can quilt with confidence knowing your machine is helping you achieve a polished finish.
Depending on the machine, the bobbin case will be either:
- Drop-in bobbin case (inset type)
- Front-load/side-load bobbin case (removable type)

A standard drop-in bobbin case for a sewing machine that uses Class 15 bobbins.

A metal M-style bobbin case with a mark showing where the screw line is to create a baseline reference.
How to Test and Adjust Bobbin Tension
Begin by cleaning the bobbin area. Use a small brush to remove lint, dust, and any loose threads. Cleaning helps prevent tension issues before they start.
Next, mark your baseline. Using a fine-point permanent marker, place a small dot next to the screw on your bobbin case, where the line of the screw is facing. Doing this gives you a clear reference point in case you need to return to the original setting. Refer to the image of the metal bobbin case above to locate the small black dot as an example.
To test your current bobbin tension, thread your machine as usual with the same top and bobbin thread you plan to use. Stitch a straight line on a fabric scrap similar to your project. Check both sides of the fabric:
- Balanced tension produces even stitches on the top and bottom.
- Loops on the underside suggest bobbin tension is too tight or the top tension is too loose.
- The bobbin thread showing on the top means the bobbin tension may be too loose or the top tension too tight.
For front-load or side-load bobbin cases, locate the small tension screw on the case. Turn the screw clockwise to increase tension or counterclockwise to decrease it. Adjust in small increments, no more than one quarter-turn at a time. Test after each adjustment.
For drop-in bobbins, remove the needle plate, then remove the bobbin cover and bobbin case. Locate the small screw on the metal leaf spring. Make the same quarter-turn adjustments as you would on a front-load bobbin case.
Small changes go a long way. Always test on scrap fabric before returning to your project. Proper bobbin tension helps create smooth, consistent stitches, reducing frustration during quilting.
Troubleshooting Bobbin Tension Issues
We've created this handy reference table that shows symptoms, likely cause, and a quick fix to address bobbin tension imbalance. This table is intended for reference after the following steps have been completed: rethreading the top thread, checking the needle for burrs or wear, replacing the needle if necessary, and adjusting the top tension. Once these adjustments have been made and tension issues persist, it's time to adjust the bobbin tension.
| Symptom | Likely Cause | Quick Fix |
|---|---|---|
| Loops or bird's nests on the underside | Bobbin tension too tight or top tension too loose | Tighten the bobbin tension screw 1/4 turn clockwise; rethread the top thread |
| Bobbin thread is visible on top | Bobbin tension is too loose | Tighten the bobbin tension screw 1/4 turn clockwise |
| The top thread is pulled and piling underneath | Bobbin tension is too tight | Loosen bobbin tension screw 1/4 turn counterclockwise |
| The top thread breaks frequently | Tension too tight or a bad/incorrect needle | Loosen bobbin tension slightly, replace the needle |
| Puckered fabric | Overall, tension is too tight | Reduce both the top and bobbin tension slightly |
| Railroad tracks | The top tension is too tight relative to the bobbin | Loosen the top tension more than you think you need to, or tighten the bobbin tension screw by a 1/4 turn |
| Eyelashes | The top tension is too loose, or the thread isn't in the take-up level/misthreaded | Tighten the top tension or loosen the bobbin tension screw by 1/4 turn counterclockwise, rethread both top thread and bobbin |
How Thread Type and Weight Affect Bobbin Tension
Not all threads perform or behave the same way in your machine. For instance, if you are quilting or sewing with an ultra-fine Invisible Thread (monofilament) and then switch to a heavier 40 wt. cotton thread, such as Majestic, your machine doesn’t automatically adjust its bobbin tension.
You Are a Bobbin Tension Pro
Mastering bobbin tension is less about mystery and more about method. The process is the same when you're quilting on a home machine or longarm; balanced tension means stronger seams, smoother stitches, and quilts you'll be proud to show off.
The more you work with your tension settings and understand how thread type and weight affect the outcome, the more confident you'll become. So grab your scrap fabric, make those tiny adjustments, and quilt on with precision.
Best Practices for Maintaining Balanced Tension
- Always clean your bobbin case before making any adjustments.
- Make incremental changes — ¼ turn at a time.
- Keep a small notebook or digital note for "go-to" settings for different threads.
- Test before starting every new project, especially when changing fabrics or thread weights.
- Don't fear adjustments. With practice, you'll know exactly how to get perfect stitches.
About YLI's 40 wt. Majestic Quilting Thread
For machine quilting, our 40 wt. Majestic thread is genuinely exceptional. Made from 100% Egyptian-grown extra-long staple cotton, this thread is available in forty-five variegated colors and five solid colors. Bold and ready to enhance any quilt with eye-catching motifs, filigree, feathers, or edge-to-edge designs. Majestic is one of our premium cotton quilting threads, available in 2,000-yard cones and 600-yard spools.
Get inspired by Majestic colors


